The Purple Rain Dress (By Hand London Flora Dress)

The Purple Rain Dress (By Hand London Flora Dress)

The aesthetic of these photos is a lot more “goth-ish hipster in a basement” than I intended.

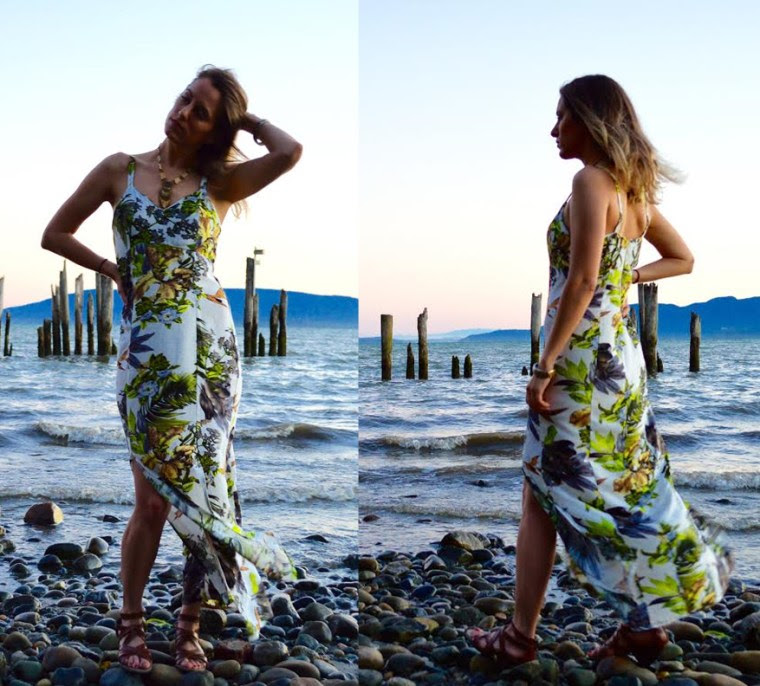
It’s been awhile, hasn’t it? My apologies for that, January is not my favorite month. Now that we’re through with apologies, the dress. The pattern is the Flora Dress from By Hand London. I’ve made it before, and you can see some pretty terrible photos of that dress here. We all know I have a love affair with this pattern company, and also cleavage, so it was only a matter of time before I made this again.

Cameo by the camera battery charger.

For this version, I opted to use this stretch velvet I found at Joann. Velvet seems very on trend lately (have I ever been on trend?), and I’ve recently started a love affair with stretch wovens. Since making my Christmas party dress in stretch satin, I feel like I’ve entered a whole new world. No zippers!! Satin and velvet are both difficult fabrics (MORE ON THAT SHIT LATER), so I jumped on the chance to avoid trying to install a zipper.

Look ma! No zip

The Flora dress has a lined bodice, and I really debated on what to use. I didn’t want to use the velvet because boob sweat is a thing, but I still needed something with stretch. In the end, I opted for the previously mentioned stretch black satin. Folks, that was a fucking stupid choice. Imagine, if you will, sewing shifty velvet to slippery satin. I shouted. I drank wine. All to no avail. In the end, I had to concede that my sewing skills were just not really up to the task, and accepted some garment flaws. I REALLY wanted to finish this garment, you guys, so I refused to be defeated. Now, you may be thinking to yourself “But Ashley, it’s not finished! You haven’t even hemmed it!” You’d be right. I was a good sewist and let it hang over night, with every intention to hem it the next day after work. But…I just wasn’t up to it. You see, velvet needs to be hemmed by hand, and we all know hand sewing isn’t my favorite. I will mostly likely even out and hem Flora this weekend, I swear.

Wiiiinnnnnnnnneeeeeeeeeee

For construction, I just did everything from memory, I didn’t look at the instructions at all. I assembled the bodice and lining, except for the side seams, and then attached them along the neckline and armholes. I then pulled the fabric through and stitched the side seams in one long seam. Easy peasy. I cut a US 10, which is my usual size in BHL. Normally I shorten the straps, but here I didn’t, I think they’re ok. When it came to basting the front bodice pieces together, I totally ignored the pattern markings. I slipped the bodice on, and just went with what I was comfortable with. Kind of just overlapped them and pinned it in place.

I somehow took no side view photos of this, my bad.

For the skirt, I sewed the pleats and attached the pieces as normal, except for the zipper situation. When it came time to attach the skirt to the bodice, I broke my walking foot 😭 I’ve gotta stop buying cheap shitty ones off Amazon. As a consequence, the side seams and pleats don’t really line up. WHATEVER MAN. I also struggled with finishing the waist seam, because velvet+lining+darts+pleats=mega bulky seams. I tried to trim the bulk as well as I could and hand turned the wheel through the rough bits.

In addition to no side views, I also set my tripod WAY too low. Well done, self.

Speaking of bulk, I think all those folded and wrapped layers make the waist area look bulkier than it should. If I was a smart girl, I would have slashed the darts open and trimmed the bulk then. I did not do that, because derp. I’m super self conscious about my waist size anyway, so this added bulk was really bumming me out. To combat that, I put a corset on underneath my dress. Not only did it help my waistline, it also made my boobs look extra fantastic. Overall, I don’t hate the results. It’s not the best made garment, but for something to get my out of my sewing funk, it’s not so bad. It’s good to have my sewjo back!! Happy sewing 🙂

Sequin Party Dress (By Hand London Charlie Dress)

Sequin Party Dress (By Hand London Charlie Dress)

Will I ever learn to smile? Probably not.

Sometimes, I wonder what life is like for people who don’t do every single thing at the absolute last minute. For about three weeks, I knew I wanted to make a sequin and satin dress for my work Christmas party. Naturally, I started it two days before the party, even though I have no experience sewing sequins. Super smart, right? It’s truly a miracle that this dress is even mostly finished.

Cold, dead eyes.
Cold, dead eyes.

I wanted to use a fairly simple pattern for this, I really wanted the fabrics to be the focus. The lovely ladies at By Hand London were kind enough to gift me with their Charlie dress pattern, and it just seemed perfect. I opted to make variation 2, with the 3/4 circle skirt. I also left the bodice band off, I can never get those to lay right on me. Since I was using satin, I decided to line the bodice for some structure. I shortened the straps a bit (which I normally do), and hacked about three inches of the skirt length. Easy peasy!

blargh.
blargh.

Now, the fabric. For the main fabric I used this stretch satin, and I am SO glad I did. Why? Because it had just enough stretch that I didn’t have to put the side zip in!! Really, really wasn’t looking forward to sewing a zipper into that sequined skirt. Very stoked. For the sequined fabric and the straps, I’m afraid I have no fabric links for you. Both were gifted to me by my dear friend Danielle, and I have no idea when or where she got them. Sorry!! I can tell you I’m wearing this petticoat here, and it’s fantastic. Just the right amount of body.

img_1014

For the most part, I followed the pattern instructions. Charlie is a very straight forward pattern, I can’t imagine how to muck it up. For the straps, I assembled them as directed, and then tacked the rose trim down every two roses. I have no idea if this is the correct way, folks. I also realize I have no decent pictures of them, my bad! To attach them to the bodice, I just sandwiched them between lining and bodice, right sides together, stitched and pressed. For the skirt overlay, I basted the sequin fabric to the satin, wrong side to right side. Then I just sewed them as one. Hopefully at least some of that made sense? That’s really all I have to say on it, it’s truly very simple. I have a few more photos below, happy sewing!

img_1016

img_1018

img_1022

The Dog Hair Coat (Sewaholic Minoru)

The Dog Hair Coat (Sewaholic Minoru)

Pondering hoods.
Pondering hoods.

I try to make a coat every year, but this year, I was really stumped as to which one to make. Originally, I’d planned to make the Quart coat from Pauline Alice, but I procrastinated buying wool until it was far too late. One of my least favorite thing about living in Cincinnati is the severe lack of fabric shops. We have Joann’s, quite a few quilting stores, and a few small fabric stores that sell apparel fabric (looking at you, Fiberge), but ZERO big, quality fabric stores. As far as I know, there’s not a single place to buy wool coating in the area! I mean what the fuck, Cincinnati.

Hidden pockets!
Hidden pockets!

So with fabric needs in mind, I settled on the Sewaholic Minoru. My dear friend Amy of That’s Sew Amy made one awhile back, and it’s awesome.  I love that it’s really a good daily wear coat, unlike my houndstooth coat. It also doesn’t hurt that Tasia posted a killer step by step sewalong. While my coat is far from perfect, it’s the most professional looking garment I’ve ever made, and that’s 100% thanks to the sewalong.

I accidentally bought a double zip and felt like you needed to see it.
I accidentally bought a double zip and felt like you needed to see it in action.

I knew I wanted my Minoru to be more of a coat than a jacket, so to make it warmer, I interlined it with snuggle flannel from my stash. I hate snuggle flannel, but it’s warm, so hiding it in inside my coat seemed perfect. I followed Tasia’s recommendation and basted it to my lining fabric. Snuggle flannel is printed on one side and white on the back, so I basted them wrong side to wrong side, as I was afraid the flannel print would show through. If you’d like to see progress shots of that kind of thing, I tend to post it on Instagram. For my main fabric, I used a black twill, with no stretch. All of these fabrics came from Joann, and I can’t find a single one on their website. Sorry! I can tell you the lining is part of their “silky prints” collection, and I swear I’ve seen it there recently.

Meet Tonks!
Meet Tonks!

I made very few changes to the pattern, other than the interlining. I opted to do pearl snaps instead of velcro on the inner pockets, because that’s what I had on hand. Like many others, I also added side seam pockets, because a coat without outer pockets is just silly. I also sized down quite a bit. According to the size chart, I should have cut a size 12, but I went with an 8 instead.  I tried on Amy’s jacket in a size 4, it’s zipped but was a bit too snug, so I took a gamble and cut a straight 8.  Everyone knows I love close fitting garments.  You guys…I didn’t have to add ANY length to the arms. That is unheard of! I think the fit is really good, though I wish I’d shortened the waist a bit. The waist elastic is just a little too low. As mentioned above, I also added a double zip. Totally unintentional, that’s just what I accidentally bought so of course I used it.

Back view.
Back view.

Overall, I’m really stoked on this coat. That said…the twill attracts dog hair like nothing else. While it doesn’t wrinkle nearly as badly as I expected, it does look wrinkled in these photos. I’d worn it a few times since finishing it, and it could really do with a good pressing. Whatever, it’s a great coat, I’m even wearing it right now. I’m running out of things to say, but I still have more photos for you guys, so prepare for a boat load of photos below. I do realize Tonks is much much prettier than me or my coat, so feel free to be distracted by her! Happy sewing 🙂

Hood details.
Hood details.
Collar tucked into the hood pocket here, looking super bitchy again.

img_0995 img_1009 img_1007 img_0999 img_0965 img_0952
img_0951

A Palette Cleanser (Jennifer Lauren Handmade Gable Top)

A Palette Cleanser (Jennifer Lauren Handmade Gable Top)

Trying to yell at dogs with my eyes.

After a difficult project, I always find myself craving an easy project. My denim jacket took forever, so I definitely wanted an easy success! I decided on the the Gable Top from Jennifer Lauren Handmade, as I’ve made it before, I know it to be quick and easy pattern.

What up double chin
What up double chin

I opted to use a discontinued cameo print thermal knit from Girl Charlee. I bought the fabric last year during their huge holiday sale, and have been unsure about what to do with it ever since. The fabric doesn’t have the stretch I need for the pattern, so I sized up from a 12 to a 14. That’s the only alteration I made! I honestly don’t have much to say about this make, I believe I said almost everything in my last post.

Always fiddling with shit.

I made the long sleeve version this time, because duh, thermal. The instructions tell you to do the sleeve a bit differently, but I treated it just like the short sleeved version. Next time, I’ll add about 2″ to the sleeves, they are way too short for my long arms!! I think I would also taper them in a bit at the end, just for personal preference. I like a fitted sleeve. Other than that, the fit seems actually pretty good for me. I’m standing weird in the back view photo below, I don’t think it typically gathers as much in the back. I really, REALLY hate back view photos, you guys. I keep trying to stand different ways to look less weird and nothing works. Blargh. Photo dump below, happy sewing 🙂

img_0920

img_0925

img_0918

img_0921

The Jacket that Didn’t Want to Be (Butterick 6390)

The Jacket that Didn’t Want to Be (Butterick 6390)

Mega bitch face
Mega bitch face

I have always wanted a jean jacket, one that actually fit my spaghetti arms. This pattern, Butterick 6390 was the perfect candidate for me, cropped and feminine, but with all the details I love so much. Gertie’s version have her signature vintage flair, but I opted for something a little more traditional.

I know I know, wrinkly dress.

The main fabric is a denim from Joann’s, unfortunately I’m not sure which one! I do know it has 2% stretch, though. Originally, I’d purchased the yardage to make a test pair of Ginger jeans, but you know…new patterns are fun. Plus jeans are scary as shit! For the lining, I opted to use this mammoth flannel from Robert Kaufman. The patterns calls for a lighter weight, silkier fabrics, but I wanted this to be warm and cozy!

I woke up early to take these and it shows. So cranky.

I’m going to be honest, this fucking jacket fought me every step of the way. In the beginning, my machine struggled with top stitching thread. I used a good quality Gutermann, thankfully I adjusted the tension (to 7) and got past that. Then, as per the usual, I struggled with the sleeve opening and cuff. I’ve never done a cuffed sleeve without a placket, my brain just couldn’t comprehend it. I had to walk away. Fast forward to attaching the waistband…my walking foot broke. You should know that I sew everything with the walking foot, I can’t remember the last time I used the “j” foot. Believe me when I tell you, I was distraught. I cried, I cursed, I threw things. I finished the waistband kind of shittily with unevenly fed layers. OH WELL MAN.

Still pissy about that walking foot.

You just have to persevere, right? Now, I must admit, my machine made a mockery of the buttonholes, and I didn’t even care. They exist, they serve their purpose, that’s about all I’m asking for right now. I wanted to wear this thing to Thanksgiving, show off my sweet patches. Which are the Browncoats symbol from Firefly, the Doctor Who logo circa 9, and the Deathly Hallows symbol from Harry Potter, btw. I have a Torchwood patch somewhere, but I couldn’t find it. Bummer, I know.

Check out those seams, yo.

Despite all this bitching and all the issues, I’m happy with end result. All the seams are flat felled seams, which always makes me happy. The pattern calls for top stitching on both sides of the seams, but I only did the one. I also used a coordinating thread color, because I was afraid my top stitching would be shit. I almost wish I hadn’t, though, because my stitching is actually pretty good! Other than dual top stitching, I also changed up the pattern by using jean buttons instead of regular buttons. I like hammering things, plus I like the look they give the jacket. I need to add them to the pockets, but I ran out. Beyond that, the only change I made was to size up to a straight 16. Based on measurements, I should have sewn a 12, but I wanted room to wear a hoodie or sweater underneath. I hope I didn’t scare you off, it really is a pattern worth sewing! Happy sewing 🙂

Alix Dress Pattern Tester (By Hand London Alix Dress)

Alix Dress Pattern Tester (By Hand London Alix Dress)

Prancin' around
Prancin’ around

Sewing time has been very limited for me as of late, but I always make time to test for my favorite pattern companies. When By Hand London, sent over their Alix Dress, I was super stoked to cut into it! Alix comes in three lengths (tunic top, minidress, and maxi), I opted for the maxi length. Generally, I do believe shorter is better, but a can wear a maxi length dress to work without have to put on tights! For me, that’s just fucking fantastic.

Really showing off my Dumbledore nose here.

Alix is definitely a style departure for me. She has a definite 70’s feel, with billowy sleeves and a flowing skirt. The sleeves and flowing skirt are so comfortable, though. The bodice is lowcut, but not too lowcut, just enough. There are no zippers or buttons here, the wast ties give it shape. It still feels so elegant though! We’re talking next level secret pajamas here.

One strand of uncurled hair, as per the usual

I followed the pattern almost exactly, cutting a US size 10 (UK 14), and adding my standard 2″ to the sleeves. Oh and pockets, of course I added inseam pockets. I used black poly peachskin from Joann’s, which is not exactly the ideal fabric for this. Head to toe poly? Yikes! But it was the only black swishy fabric I could find in the appropriate width (maxi length requires a wider fabric), so I made due. It’s actually not bad for fall, though in the spring and summer, I’d prefer a rayon, perhaps.

Always fiddling with m skirt

I almost wish there was a bit more room in the bust, I will probably add that for my tunic version. Other than that, I have no problems with Alix! The directions were easy to follow and as detailed as always. It’s super comfortable to wear, yet still elegant. I wore mine out last night for a witch-themed charity event, and got so many compliments. Are you planning to sew up an Alix dress? Happy sewing 🙂

Even more Kim Dresses (By Hand London Kim Dress, duh)

Even more Kim Dresses (By Hand London Kim Dress, duh)

My bangs need to be upgraded.  Get it?  Because Cybermen
My bangs need to be upgraded. Get it? Because Cybermen

Anytime I don’t know what to do with a fabric, I immediately think of the Kim Dress. The princess seams suit prints better than darts, in my mind, at least. I’ve made this pattern a few times, and BHL dresses tend to fit me pretty well without a lot of fuss, which is great for someone without a lot of free time. Now, that said, they are tight. I like tight, if you don’t, size up. Whatever floats your boat!

Nothing says "this series really isn't for children" like a mini dress, right?
Nothing says “this series really isn’t for children” like a mini dress, right?

Both the Harry Potter fabricand the Doctor Who fabric are quilting cotton, and the Kim Dress really lends itself to such fabrics. You don’t need any stretch, and it comes together so so easily. FYI, you will never convince me there’s a better way to sew a fully lined bodice than the way Kim is done. Seriously, it’s the best. We’re talking burrito method levels of magic! That said, I opted not to line the Harry Potter version you see here, entirely because I just wanted to see how I’d like it bias finished. Spoiler: It’s not as good, just line the damn thing.

Serious question:  do you guys ever just wish I'd take the damn hair tie off my wrist??
Serious question: do you guys ever just wish I’d take the damn hair tie off my wrist??

As I said, I’ve made this pattern before, this one being one of my most complimented makes. In all honesty, I haven’t used the skirt portion of the pattern for any of these. Not because they aren’t lovely, because they certainly are. Only because I’m lazy and I didn’t want to pin and cut the pattern piece. Each of these have been made just using a rectangle of fabric. For today’s versions, the rectangle was a good deal smaller, because that’s how much fabric I had. Previously, I did large pleats. This time, I just did a few simple gathers. No biggie.

Back isn't broken, just awkward.
Back isn’t broken, just awkward.

The only alteration I made was to take off half an inch at the shoulder seams. I have short shoulders, so this is fairly common for me. Other than that…I don’t really have a lot to add, sorry. If you’re making one for the first time, you could always construct the lining as your muslin. Princess seams and side seams are super easy to adjust! As I mentioned before, the pattern doesn’t have a lot of ease, so if you’re in doubt, size up! Happy sewing 🙂

Seam Ripping Woes (Colette Rue Tester)

Seam Ripping Woes (Colette Rue Tester)

Bitch face forever.
Bitch face forever.

I was pretty stoked to be part of the testing group for the new Colette pattern, so when they sent over Rue, I immediately started thinking of fabric ideas. I really wanted to use something that showed off the curved lines on the bodice. Originally, I planned to do version 2 (with the longer sleeves) in this mammoth flannel from Robert Kaufman, but the thought of that plaid matching made my heart hurt. After browsing my fabric stash on Cora, I settled on this Cotton and Steel print.

Weird claw hand courtesy of my camera remote.

At first glance, I found the instructions for Rue to be a bit daunting, there are 46 (PDF) pages! Not to worry, though, the instructions contain detailed layouts and directions for both versions. WHEW! Rue is fully lined, so do expect to invest a little extra time for construction. Most of the bodice shaping comes from the curved front seam and some small tucks on each side. The front seam curve comes up a bit too high or too low on me, I can’t decide which. I think for the pattern it should be higher, but for my taste, lower? Either way, it needs fixing.

I promise I don't sleep standing up.
I promise I don’t sleep standing up.

I opted to cut the side front pieces on the bias, because I thought it would look cool. The pattern does NOT call for this, so if you do it, keep in mind that bias cut stuff will stretch. This was especially a problem for me, because I had trouble matching up the bodice pieces on my muslin as well, even though that was straight cut. I don’t know why, but they just wouldn’t line up for me! I imagine it’s user error, as it’s ALWAYS user error. This is version 2, the one with the longer sleeves and skirt gathers. I decided to shorten the sleeves last minute and didn’t want to print the pattern all over again. So be warned, these are not the version 1 sleeves. Other than that, I made no alterations. That is, unless you’re thinking of that fucking GIANT weird pleat pucker thing near the neckline. That beauty is courtesy of seam ripper accident. Don’t rush your sewing, folks, just don’t.

I'm still pissed at my seam ripper.
I’m still pissed at my seam ripper.

All and all, Rue came together a lot more quickly than I’d expected, seam ripper destruction and all. This is exactly the kind of thing I’ve been meaning to make for office wear, cute yet still professional. Maybe I can work up the courage to suffer through plaid matching for a longer sleeved version? I’ll have to consult some vodka about it, but it just might happen! Happy sewing 🙂

A Knit Success (Jennifer Lauren Handmade Gable Top)

A Knit Success (Jennifer Lauren Handmade Gable Top)

Hiding my gut with my man hands.

It’s been awhile since I’ve posted, I know. I’ve been working on a swimsuit, but I’m having some fit issues. I’ve also run out of summer, so you’ll not being seeing that suit until next year. In the meantime, I’ve had an actual success with a knit fabric, which is unheard of. The pattern is the Gable Top from Jennifer Lauren Handmade, which she so graciously provided to me for reviewing. So yes, the pattern was free, but my opinions are still my own.

Not preggo, just standing weird in high waisted jeans. Also, I like snacks.

There are two things I love in a PDF pattern: a nested pattern (patterns that allow you to print only certain sizes) and a very organized PDF file. Jennifer’s is the later. The Gable Top comes with three sleeve options, and in the instructions, she tells you which pages to print for each. No need to print the whole pattern just for the short sleeves. My cutting area is pretty small, so it also helps that I can assemble sections at a time (bodice front, back, sleeves), instead of the entire garment.

Still hate back photos.

The instructions are really straight forward, this would be a great beginner pattern! There’s plenty of information about choosing the right knit fabric, and explanations of the sewing terms. As you know, I fucking hate knits, and I never ever seem to use the right one. Based on her descriptions, I was able to dig DEEP in the stash and pull out this fabric, which turned out to be perfect! I actually used this fabric for this tank, which was old even then. Yay for stash busting!

Canine photo bomber, judging me.

Assembly went by crazy quickly. I mean wow. I cut a size 12, based on my measurements (37/29/40), and liked the fit. This top has negative ease, so it’s really fitted. If that’s not for you, size up. Originally I’d planned to do the cuffed sleeves, but didn’t have enough fabric, so short sleeves it was. Now, before I’d even started sewing, I knew I was going to insert the sleeves flat, meaning I would sew the sleeves together at the same time as the bodice. If that makes sense. I was very pleasantly surprised to see that’s exactly what the instructions called for! Bravo, Jennifer.

Realized I can turn my camera to the side, using my tripod, was a revelation.

I did most of the construction with my serger, with the exception of hems and finishing the neckline. You don’t have to do that, it’s just my preference. For the sleeves, I just serged the edges and stitched them down with a straight stitch. For the waist, I wanted a little stretch, but I hate a zig zag stitch. I ended up doing a very shallow (I don’t know the correct term here) zig zag stitch, with a stitch height of about 1.5. On the neckline, you just fold it down and stitch. There’s a bit of play there, so try it on and see what you like. As per the pattern, I added a bit of ribbon on the shoulder seems to give it a bit of stability, that’s topstitched down. That’s all there was to it! Easy peasy. I actually wore this out, and no one believed it was handmade, so that’s a win. I can’t believe I’m going to say this, but…I actually plan to make this KNIT top again. Shocking, I know.

Maxi Sewalong Showcase and Winner!

Maxi Sewalong Showcase and Winner!

The 2nd annual Maxi Sew-Along with That’s Sew Amy has officially come to an end. I want to say a huge thank you to everyone who participated and to 5 Out Of 4 Patterns for being our sponsor. I had a lot of fun this time around and hope you did too! Below, in no particular order, is a showcase of all of our great participants – thank you so much! (If we left anyone out or credited you incorrectly, please e-mail me!)

Reveal:

Michelle from Little Heart Threads made Patterns For Pirates – Essential Tank in maxi length:
LittleHeartThreads

Caroline from Church Sexy made 2 Lille’s from Greenstyle Creations dresses:
CarolineOng
CarolineOng2

Melissa from Mahlica Designs made McCall’s 6559.
MahlicaDesigns

Carmen from See Carmen Sew made a  FABULOUS vintage Vogue 8974:
SeeCarmenSew

Lindsay from Doodle Number 5 made Sis Boom’s Jenny bodice mashed with Love Notion’s Bluezette skirt in a killer print:
DoodleNumber5

Andie from Sew Pretty In Pink made the Upton Dress from Cashmerette:
SewPrettyInPink

Sarah Jane made a lovely tropical Anna Dress from By Hand London:
SarahJaneLocke

Amy from Sew Luxy made McCall’s 7161, and it’s just stunning:
SewLuxy

I made vintage Simplicity 7484:
SewnByAshley

And Amy of That’s Sew Amy made the most kickass 5 Out Of 4 Patterns Journey Dress:
ThatsSewAmy

Honorable mention to Catherine for participating but she wasn’t able to fully finish it. I wanted to add her here because that stripe matching had to be a headache! She did great though

CatherineLiang

Everyone did such an amazing job! I love seeing which patterns everyone picked and the final garment – congratulations on amazing work

A winner has been choose at random. Amy wrote down all the participants names and put them in a hat and picked one:

step1

step2

step3

And the winner is….

step4

CONGRATULATIONS Amy from Sew Luxy!! You’ve won a FREE pattern of your choice from 5 Out Of 4 Patterns! Amy will be getting in contact with you shortly 🙂

Thank you so much to everyone and we will do this all over again next summer!